
How to Build a Working Prototype in Two Weeks: A Teen's Step-by-Step Guide
You don't need to code, and you don't need months to build a working prototype. You need 14 focused days and the right sequence of decisions. This guide gives you both: the plan, the tools, and what to cut when you're behind.
Alex Moneton built WheresMyMEP.eu in a few days of vibe coding. No technical background, no dev team. Just a clear problem and the right tools. It launched to 30,000 users in its first seven days. That's the extreme end of what's possible, but the underlying lesson holds for everyone.
Where you're starting from
This guide assumes you've already done your customer discovery. You know your ICP (Ideal Customer Profile), you've validated a real customer need, and you have a prioritised feature list. If you haven't done that yet, go back to your Stella session on Customer Discovery first. This guide picks up right where that one ends.
"Prototype" Doesn't Mean What You Think It Means
A prototype is the fastest, cheapest way to prove your core assumption, not a polished product. Most teens picture something close to a finished app. It isn't. It's the minimum you need to find out whether your idea actually holds up when a real person uses it.
There are four stages between an idea and a product, and they're often confused with each other:
Stage | Question it answers | Typical build time | What "done" looks like |
POC (proof of concept) | Does this even work? | Days | Looks like it, rough, internal only |
Prototype | Can someone use it? | 1–2 weeks | Works, testable by real users |
MVP | Will people pay or return? | Weeks to months | Tests willingness to pay, real usage |
Final product | Can this scale? | Months+ | Production-ready, supports growth |
A 14-day build lands you a prototype. Occasionally a rough MVP, if you're fast and disciplined. Set that expectation honestly with yourself now, so you're not disappointed on Day 14 that you haven't built the next unicorn.
Hurdles for minors A few practical things to plan for on Day 1, not Day 10. You may need an adult to hold the legal account for app store distribution and payouts. Apple, for example, sets a minimum age by country and region, and distribution and paid apps still require an adult as the legal account holder for contracts and payouts. Most tools also require a card for subscriptions. Sort this out before you're mid-build and stuck.
What Should You Define Before You Start Building?
Before you touch a single tool, write down your scope, your one problem to solve, and your platform, in that order. Skipping this is the fastest way to burn your two weeks on the wrong thing.
Write your scope of work. Turn your prioritised feature list into a simple table: feature, status, business value, cost or difficulty, dependencies, and which iteration it belongs to (this build, or backlog). A spreadsheet with those columns is genuinely enough. Only reach for a tool like Asana or Jira if you already use one comfortably; learning project management software isn't a good use of day one.
Once your feature list exists, you need a fast way to decide what actually earns a place in your two weeks. That's where an impact/effort matrix earns its keep.
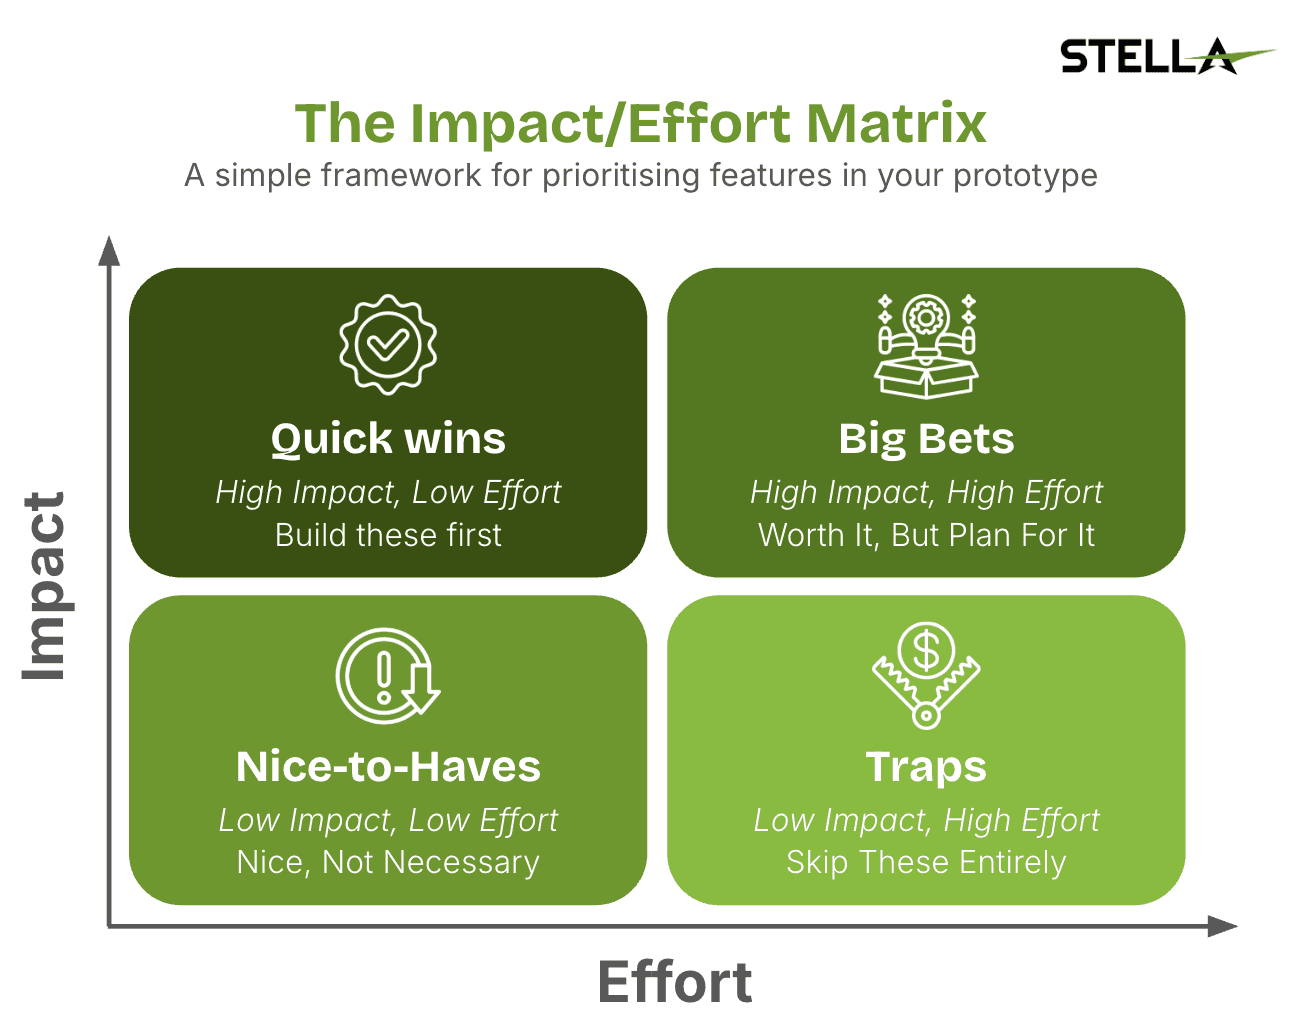
Everything in Quick Wins goes straight onto your Day 1 list. Big Bets are worth including, but only once Quick Wins are locked in. Everything else either waits for a future version, or, if it lands in Traps, doesn't get built at all.
Pick one problem, one user flow. You already have your ICP from customer discovery. The discipline here is narrower: choose the single flow that solves the single most important problem for that customer, and cut everything that isn't that flow. If you can't describe what your prototype does in one sentence, you haven't finished this step.
Define your resolutions, deliberately. Decide which screens and platforms you're actually building for, and know what you're trading off. The more screen sizes and platforms you support, the more testing complexity and the more bugs you'll be chasing in week two. If your users are mostly on one platform, build for that one first and treat anything else as a stretch goal.
What Is Feature Creep, and How Do You Avoid It?
Feature creep is when you keep adding features, or keep polishing the ones you already have, until your build outgrows the two weeks you have to finish it. It's the most common reason two-week builds don't ship, not lack of skill. It shows up in two forms: adding features that were never on your list, and over-polishing features that were.
The data backs this up. Across hundreds of MVPs, startups that launched with 1–5 features reached product-market fit within 12 months 39% of the time, compared with just 8% for launches with 31 or more features (source: House of MVPs). Fewer features, built well, beats more features, built thin.
I've seen this up close. Feature creep is the single most common reason I've watched tech builds fail: strain on the dev team, strain on the budget, launches pushed back again and again. And this happens to funded, experienced founders, not just first-timers. If it happened to them, it will happen to you too, unless you actively guard against it.
The rule of thumb: if it isn't on your Day 1 feature list, it goes to backlog. Not into this build.
What Tools Do You Need to Build Without Coding?
No-code and vibe-coding tools mean the real bottleneck in 2026 isn't technical skill. It's decision-making. You genuinely don't need to know how to code to build something real. You need to know which tool does what, and in which order to use them.
Here's the toolkit, broken down by what each category actually does in your build:
Category | What it's for | Examples |
Brainstorming and spec writing | Shaping your idea, writing user stories, drafting your feature list and specs before you build anything | Claude, ChatGPT, Gemini |
All-in-one app builders | Turning a prompt into a working app: front end, back end, and logic together | Lovable, Base44, bolt.new, v0 by Vercel, Replit |
Database | Storing and organising your app's data (users, content, whatever your app tracks) | Supabase |
Design and assets | Designing screens, icons, and visual assets, and generating images if you need them | Figma |
Landing page | A simple, polished page to explain your product and collect early sign-ups, separate from the app itself | Framer |
Deployment and hosting | Getting your build live on the internet where real users can reach it | Vercel, Netlify (often bundled into your all-in-one builder) |
A practical note on how these fit together: most vibe-coding tools now handle the database and deployment for you behind the scenes, which is why the "stack" feels a lot simpler in 2026 than it did even two years ago. Start with an all-in-one builder, and only reach for a standalone tool in each category if you hit a limit the all-in-one tool can't handle.
Sketch your wireframes before you design anything. Once your feature list is locked, rough out each screen's layout on paper or in a simple tool: what goes where, what the user taps first, what happens next. This is not the same step as UI design, and skipping it is why so many prototypes end up redesigned halfway through. A wireframe costs you an hour. A UI you have to rebuild costs you days.
Then define your UI once, not screen by screen. Set your branding (colours, font, overall look and feel) as a small set of decisions up front, then let your tool apply them consistently across every screen. Don't design each screen individually; that's a final-product habit, and you're not building a final product yet.
What Should You Cut If You're Running Out of Time?
Cut features used by a minority of users, and simplify design. Never cut testing. If Day 11 arrives and you're behind, here's the order to make peace with:
Cut any feature that only a small slice of your users would touch.
Simplify visual design before you simplify function. A plain screen that works beats a beautiful screen that doesn't.
Keep it lean rather than trying to save everything at 80% quality.
Do not skip testing to buy yourself build time. A feature nobody tested is a feature you don't actually know works.
This is a different discipline from avoiding feature creep. That section was about prevention: not adding weight in the first place. This one is triage: what to drop once the clock is already against you.
You Built It. Now What Happens?
Testing is where most of the real learning happens. Expect a lot of bugs, and treat that as normal, not failure. The prototype isn't the finish line. It's the thing that finally tells you whether your idea works.
I learned this firsthand on a business simulation I built to teach students how startups actually work. After the first build, testers raised more than 200 issues. It took ten days to work through them. Only around a dozen turned out to be genuinely critical bugs; the rest were minor issues and ideas for improvement. If I'd had less time, that dozen is the only thing I would have touched, and the product still would have worked.
How to actually test, and what to use:
Method | What it tells you | Simple tools to run it |
Live user testing sessions | Where people get stuck in real time, in their own words | A video call, screen recording, or a tool like Loom |
Observation | What people actually do, separate from what they say | Session recordings and screen-share, without leading them |
Quick interviews | The reasoning behind a behaviour, once you've already seen it | A short call or voice memo, five to ten minutes is enough |
Surveys and rating scales | Quantified reactions across a larger group | Google Forms, Typeform |
Behaviour signals | Where people drop off, what they never click, what they use repeatedly | Basic analytics built into your builder, or a lightweight tool like PostHog |
Use at least two of these together. A survey alone tells you what people claim; watching someone actually use your prototype tells you what's true. The gap between those two is usually where the real insight is.
Rules that make testing useful instead of misleading:
Watch behaviour, not stated opinion. What people say they'd do and what they actually do are often different things.
Avoid leading questions. "Don't you think this is easy to use?" isn't a real question.
Get a large enough sample. Three friends being polite isn't a test.
Mind the politeness bias. People are nicer to your face than they are in private.
Don't ignore negative feedback because it's uncomfortable. It's usually the most useful feedback you'll get.
Resist folding in every suggestion. That's feature creep's second act, and it's just as dangerous the second time around.
Once you've triaged what you've learned, you're moving into the Build, Measure, Learn loop: the cycle of shipping something, learning from it, and shipping the next version. That's genuinely a separate stage from the 14 days covered here, and worth its own guide.
One last practical note: if real users are testing your prototype, you're likely collecting some of their data. Don't be careless with it. Even at prototype stage, treat what people share with you as something to protect, not something to hoard.
Your Actual 14-Day Plan
Days | Focus |
Day 1 | Finalise your prioritised feature list. Start recruiting beta testers in parallel. |
Days 2–3 | Write detailed specs. Choose your tools and tech stack. |
Day 4 | Sketch your wireframes. |
Day 5 | Define branding and UI, not every screen individually. |
Days 6–8 | Build with vibe-coding tools. |
(break) | Built-in rest and recharge break. |
Days 9–10 | Continue building, feature by feature. |
Days 11–12 | Test with real users. Log every issue you find. |
Days 13–14 | Fix critical bugs first, then whatever else time allows. |
This plan only works if you've already done the thinking in the sections above it. The days go fast, and there's no time left in the schedule to figure out your scope or your feature list once building starts. Do the deciding first. Then build.
Author

Founder @ Stella
EDUCATION: INSEAD MBA · Wharton · Centrale Lyon · Tohoku University
Guillaume Catella is a serial entrepreneur, former CTO, and founder of Creatella, a venture builder that has launched 50+ startups raising a combined $50M+. Over 18 years across France, Singapore, and Japan, he has built ventures in Fintech, EdTech, and e-commerce, and co-founded Creatella Impact to accelerate 200+ women-led startups in emerging markets. Driven by a passion to help shape the next generation of founders, he recently launched Stella, an entrepreneurship education venture. Guillaume also invests in early-stage startups and mentors founders across top VC programs, institutions and accelerators, including INSEAD, ESSEC, EDHEC, University of Helsinki, Founder Institute, and DOHE.